
03 Sep 2011
Implementing Diapo in Blogger
See Demo Download
Steps to Add it to Blogger:
1.Login to the Blogger account
2. Now Go to Design > Edit HTML.

Note: Please Host all the files on free hosting service like DropBox or Blogspot itself!

3.Now search for the </head> tag and paste the following code just Above/Before it. (How to copy code easily)
<link rel='stylesheet' id='style-css'  href='diapo.css' type='text/css' media='all' />
<script type='text/javascript' src='http://ajax.googleapis.com/ajax/libs/jquery/1.6.2/jquery.min.js'></script>
<script type='text/javascript' src='jquery.easing.1.3.js'></script>
<script type='text/javascript' src='jquery.hoverIntent.minified.js'></script>
<script type='text/javascript' src='diapo.js'></script>
<script>
$(function(){
 $('.pix_diapo').diapo();
});
</script>
Note: Please Host all the files on free hosting service like DropBox or Blogspot itself!
2.Go to the Post/Page/Gadget you want to add this plugin and then go to Edit HTML tab .

3.Now copy the code from below and paste it there. (How to copy code easily)
<link rel='stylesheet' id='style-css'  href='diapo.css' type='text/css' media='all' />
<script type='text/javascript' src='http://ajax.googleapis.com/ajax/libs/jquery/1.6.2/jquery.min.js'></script>
<script type='text/javascript' src='jquery.easing.1.3.js'></script>
<script type='text/javascript' src='jquery.hoverIntent.minified.js'></script>
<script type='text/javascript' src='diapo.js'></script>
<script>
$(function(){
 $('.pix_diapo').diapo();
});
</script>
Note: Please Host all the files on free hosting service like DropBox or Blogspot itself!
4.Now for adding the images into this plugin see the following markup:
<div class="pix_diapo">
<div data-thumb="Small.jpg">
<img src="Large.jpg">
<div class="caption elemHover fromLeft">
This is a simple sliding image with caption. You can have more than one caption and decide the layout of the caption via css.
</div>
</div>
<div data-thumb="Small1.jpg">
<img src="Large1.jpg">
<div class="caption elemHover fromRight" style="bottom:65px; padding-bottom:5px; color:#ff0; text-transform:uppercase">
Here you can see two captions.
</div>
<div class="caption elemHover fromLeft" style="padding-top:5px;">
The first are loaded immediately before than the second one
</div>
</div>
<div data-thumb="Small2.jpg" data-time="7000">
<img src="Large2.jpg">
<div class="elemHover caption fromLeft">
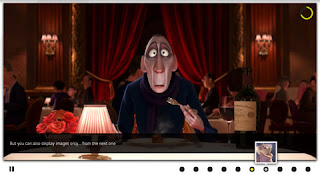
You can also get the same effect as the caption with:
</div>
</div>
<div data-thumb="Small3.jpg">
<iframe width="940" height="470" src="http://www.youtube.com/embed/qas5lWp7_R0?wmode=transparent&autoplay=1" data-fake="FakeLarge3.jpg" frameborder="0" allowfullscreen></iframe>
<div class="elemHover caption fromLeft elemToHide">
You can also display videos, but it requires a "fake image" a.k.a. the Screenshot of video before starting
</div>
</div>
</div>
The div block with class "pix_diapo" is the container of the images to be displayed.
data-thumb is the container of the thumbnail which appears when mouse is hovered over the pagination icons.
The class "Caption elemHover fromZZZZ" is used to define the caption for the Slide. Here ZZZZ can be replaced by left ,right,top or bottom. ZZZZ defines from where the caption will enter the screen.
Videos are also embeddable but you will have put a fake image for the slide transitions. The fake image should normally be the starting screenshot of the video itself like for example if you are embedding a YouTube Video then the starting screenshot should be something like this

As you see the Image contains the Play button from YouTube to make it look like a real video
Here are some customized JavaScript for changing default Options:
<script>
$(function(){
 $('.pix_diapo').diapo({fx: 'scrollHorz', time: '5000'});
});
</script>
Here fx is the effect you want to apply between slide transitions (by default it is random)
time is the interval in microseconds between sliding .
For even more Options visit Here
5.Now save the Post/Page.
See Demo Download
Til next time,
Prayag Verma
at 03:22
